This tutorial explains how to simply UV a basic box crate, and paint it up to look like old worn wood etc using the Paintbrush tool, a little Dodge and Burn and Layers...READ ON
1. Create a cube and make it editable, 2. Tick COLOR and untick SPECULAR, 3. Click here and 4. Choose CREATE NEW TEXTURE
In the box that pops up 1. set it on NEW TEXTURE (default) 2. Set it to 1024x1024 (or whatever size you need) 3. Choose a beige/grey colour for the crates base colour, 4. Click OK
OK now change to BODYPAINT and 1. Click the WIZARD, 2. click NEXT, 3. click NEXT, 4. Set min/max to 1024x1024 for a square map and 5. Click OK
1. Click the TEXTURE TAB and choose SHOW UV MESH and you get the 6 sides of the cube, 2. Change to UV MODE, 3. Choose the SELECTION TOOL, 4. Select one of the faces/sides.
1. Using the SELECT and MOVE TOOLS 2. Move all the sides on top of each other creating one UV rectangle, this basically means whatever you paint will go onto all 6 sides of the crate and to keep things simple thats how were doing it ;-)
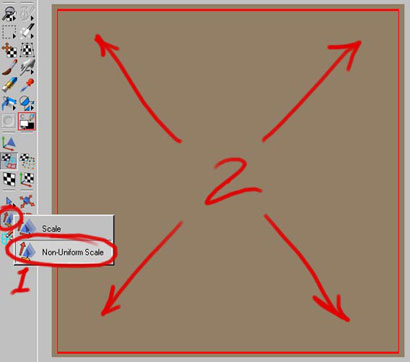
1. Choose the SCALE TOOL and NON UNIFORM SCALE, 2. Scale up the UV's to basically fill the UV space as shown.
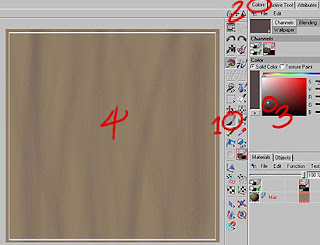
1. Tick the material so Bodypaint knows what to paint on, 2. Choose the PAINTBRUSH TOOL, 3. Choose BITMAP and 4. Choose something like CHALK SHARP or SOFT and if you use a WACOM activate the PRESSURE blue dot for a little more control.
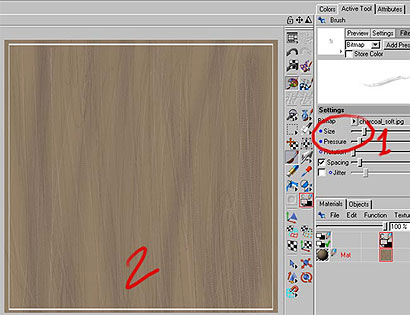
1. Choose the BRUSH TOOL and set the pressure LOW, 2. Click the COLORS TAB and 3. Choose a dark brownish colour, 4. Paint on some vertical lines with a LARGE BRUSH, add a few more lines with a Light colour as well, basically a few variations to start getting that wooden look.
Still on the BRUSH TOOL 1. Set the SIZE to SMALL and the PRESSURE to LOW, 2. Using various light/dark colours whack in some fine lines to add to the detail in the wood...
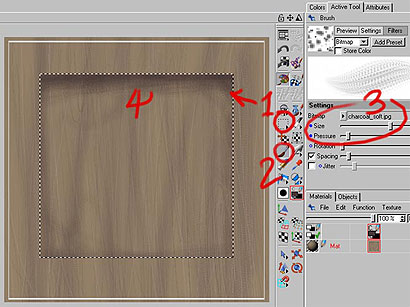
1. Choose the RECTANGLE SELECTION TOOL and select a square inside to make the inset part, 2. Back to the BRUSH TOOL, 3. Use a nice BIG brush set on LOW PRESSURE with a dark colour and 4. start to shade in some shadows and general dirt etc
1. BRUSH TOOL 2. Set it on a SMALL size and 3. Put in some DARK lines to define the panels and a few notches etc...
Deselect the SELECTION and using the DODGE and BURN TOOLS dirty it up some more, and add some highlights to the panels and notches...
A Quick check in the 3D view and we have a semi decent looking if boring crate so far ;-)
1. RIGHT CLICK the Material and Choose NEW LAYER, 3. EXPAND it so you see both layers by clicking the little triangle, 4. Click the NEW LAYER so your working on that layer, 5. Paint in a Nail hole or rivet type thingy...see next step...
1. Use the SLECTION TOOL and select the hole, 2. Choose the MOVE TOOL and 3. HOLD the ALT KEY and 4,5,6,7 COPY the hole around the crate several times as shown!!
1. RIGHT CLICK the LAYER and 2. Choose FLATTEN LAYERS to set it back to one layer.
1. Back to the BRUSH TOOL, 2. Click the COLORS TAB and 3. Choose a greenish colour. Using a nice big brush set on LOW PRESSURE and put in some green moss/rot around the bottom edges. You can add more details at this point, maybe some text or use the SMUDGE TOOL to tidy things up a little or add more lines/detail etc. Have Fun!!
Heres a quick render with a few copies placed on a floor, I hope you found this tutorial useful, Cya's


0 Response to "Painting A Crate"
Post a Comment